Installing TCPLAYER
Windows
When you download and run TCPLAYER on Windows, you'll likely see security warnings from your browser and from Windows itself, flagging the app as coming from an "unknown publisher."
This is expected, and TCPLAYER is safe. The warnings appear because the app isn't code-signed with a commercial certificate. Unfortunately, the certificate authorities Microsoft relies on don't currently offer signing services in every country — including where TCPLAYER is developed — so signing simply isn't available to us yet. It's a limitation of the system, not a reflection of the app.
To install:
In your browser (especially Microsoft Edge): the download may be blocked in several steps. Click through them — choose Keep, then Keep anyway / Show more → Keep when prompted. Edge is particularly aggressive and may ask more than once. When you run the installer, if Windows SmartScreen appears ("Windows protected your PC"), click More info, then Run anyway. Proceed with the installation as normal.
macOS
Installation on macOS is smooth. TCPLAYER is notarized with Apple, so the only prompt you'll see is the standard confirmation that you're opening an app downloaded from the internet. Just confirm, and you're good to go.
Sessions & Auto-Save
You won't find a "Save Project" or "Load Project" button anywhere in TCPLAYER — and that's on purpose. Here's how it works instead.
How it works
Just start working. Build your playlist, drop your markers, tweak your settings. When you close the app, everything is saved automatically to Documents/TCPLAYER — a separate data file per track, plus files for your settings and your playlist. Next time you launch TCPLAYER, it all loads back exactly as you left it.
There's no project to name, save, or reopen. The idea is simple: once a show's done, there's rarely a reason to go back to that exact playlist — so why make you manage project files? Your work is always there, always current, with zero effort.
If you'd rather not rely on the auto-save — hit Ctrl+S (Windows) or Cmd+S (Mac) at any point. It does exactly what TCPLAYER does on exit: saves everything, right now. For the peace of mind, if you want it.
Waveform cache
Every time a new track loads, TCPLAYER caches its waveform to Documents/TCPLAYER/Cache. This is what makes tracks reopen instantly instead of re-analyzing the audio every time. Each cache file runs 2–3 MB per track.
TCPLAYER keeps this tidy on its own: on launch, it checks whether each cache file still belongs to a track in your playlist. If a track's gone, its cache gets deleted automatically. No orphaned files piling up.
Housekeeping
The one thing left to you: every now and then, pop into Documents/TCPLAYER and clean out saved data for tracks you no longer need. These are just small files — a few kilobytes each — so it's not about disk space, just keeping the folder clean. Delete what you don't want; TCPLAYER won't miss it.
Compact Mode
Compact Mode
TCPLAYER includes a Compact Mode that strips the interface down to the essentials — hiding the track list and marker table, leaving only the waveform with its markers.
Toggle Compact Mode:
Windows: Ctrl + `
macOS: Cmd + `
The compact window remembers its position, so you don't have to reposition it every time — set it once, and it reappears exactly where you left it.
This makes Compact Mode ideal for docking TCPLAYER "inside" the interface of any on-PC control solution. It sits neatly alongside your existing tools, giving you an effectively native experience without leaving your main workspace.
Main Window
The main TCPLAYER interface.
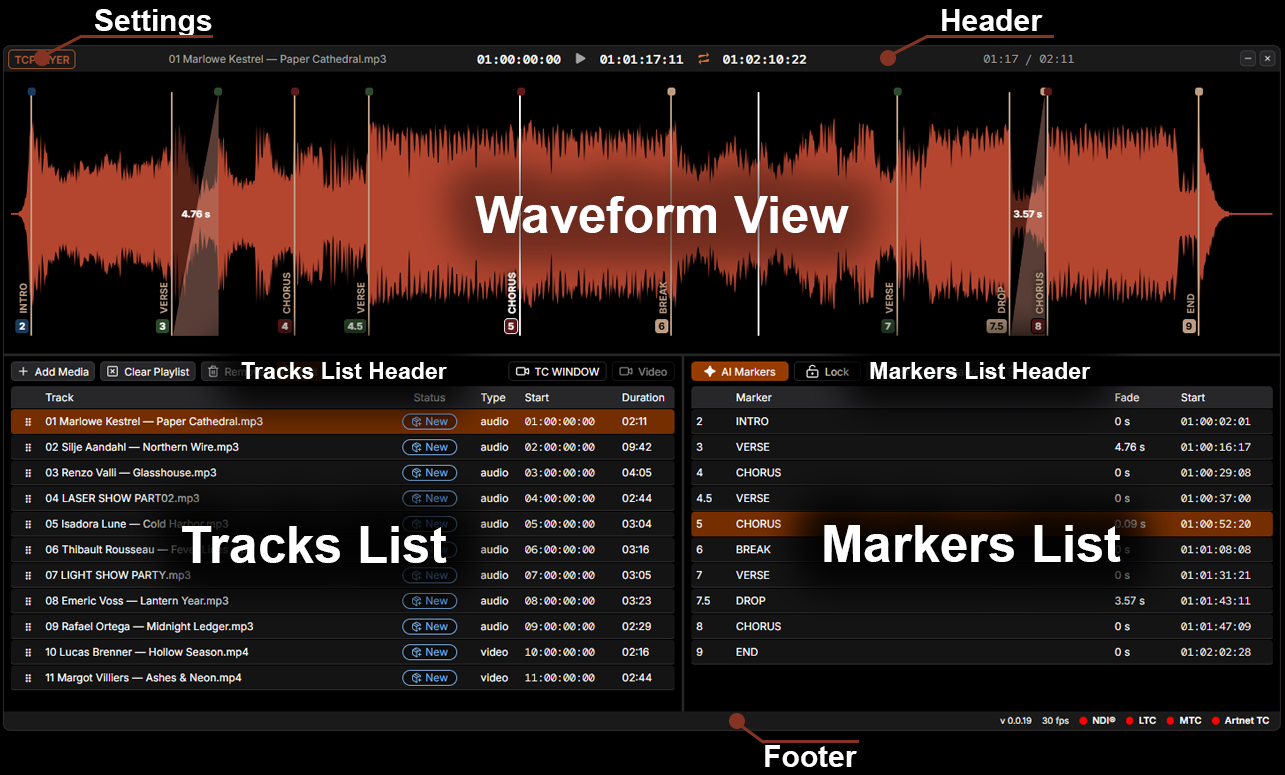
The main window is divided into five parts.
Header
Open the settings window, control playback transport, and read the timecodes for the playhead and the start and end of a selected region. It also shows the current playback position and the total track duration.
Waveform View
Your main workspace — the waveform, markers, and BPM readout all live here.
Create Markers
There are several ways to create markers.
- Press
mto add a single marker at the playhead. A quick input pops up:
- Start typing the name of your new marker. If it's defined in your marker set, TCPLAYER suggests it automatically. Press Enter to accept, and the marker appears at the playhead. You can also give it a name that isn't in the set, or pick an existing one from the list that appears on the right.
-
Hold Alt and drag a marker to create a duplicate with a unique number.
-
To select multiple markers, hold Ctrl/Cmd and drag across the waveform — every marker inside the area is selected.
-
To delete the selected markers, press Del/Backspace.
-
Set a fade by dragging the top of a marker to the right. The fade time in seconds shows up right at the fade point on the waveform.
Edit Markers
Right-click any marker to open its context menu.
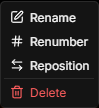
-
Rename — opens an input field for a new name. If the name exists in your marker set, the marker takes on its defined color.
-
Renumber — assign a new number. If it doesn't match your auto-numbering strategy or falls outside the valid range, TCPLAYER assigns a corrected one.
-
Reposition — give the marker a new timecode and it jumps to that point on the waveform.
-
Delete — remove the selected marker.
Tracks List
An interactive table of your imported tracks.
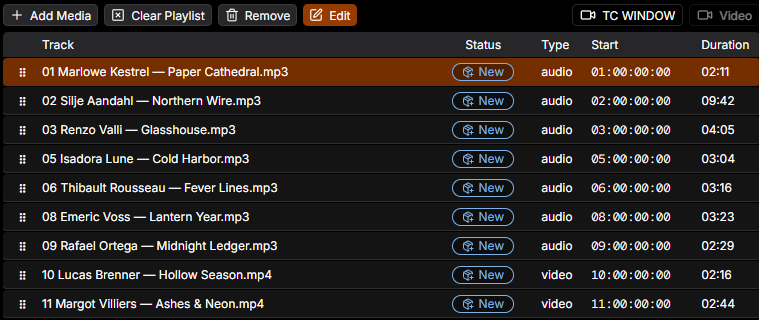
Tracks List Header
The controls for managing your track list.
-
Add Media — adds more media to your playlist.
-
Clear Playlist — wipes the entire playlist. Careful: this can't be undone, though your files stay untouched on disk.
-
Remove — takes a track out of the playlist.
-
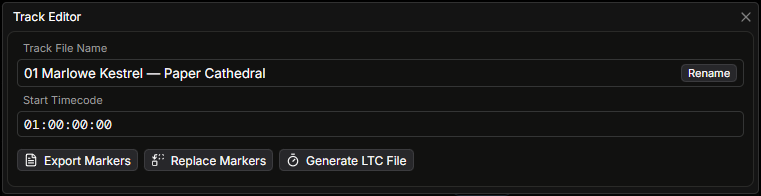
Edit — opens a small drawer:
-
TC Window — opens a large timecode display.
-
Video — opens a video window, if the media file has a video track.
-
Track File Name — rename the track. Note this renames the actual file on disk, not just the playlist entry.
-
Start Timecode — set the track's starting timecode.
-
Export Markers — export the markers in your chosen format.
-
Replace Markers — swap the current track's markers for saved markers from another track.
-
Generate LTC File — render an LTC WAV file for the current track.
Tracks List Table
-
Drag and drop tracks to arrange the playlist in any order you need.
-
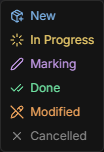
The Status column lets you tag tracks with a work status from a dropdown — handy for tracking what's still to do or what needs reworking.
-
The Type column is informational: TCPLAYER shows what it found in the media — audio only, or audio with video.
-
The Start column lets you change the selected track's start timecode inline.
-
The Duration column shows the length of the media file.
Markers List
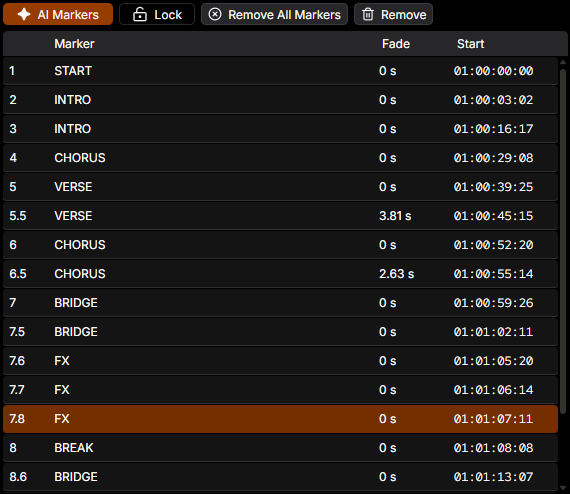
An interactive table of the markers you've created.
Markers List Header
-
AI Markers — AI-powered marker generation.
On first launch, TCPLAYER prompts you to download the AI plugin. Sizes vary by platform:
-
Windows — 2.6 GB zipped, ~5 GB installed
-
macOS — 400 MB zipped, ~1.2 GB installed
Make sure you have enough space on your system drive and a connection that can handle the download.
Hardware requirements:
-
Windows — a discrete NVIDIA GPU (GTX or RTX series). Integrated graphics are not supported.
-
macOS — Apple Silicon (M-series). Intel Macs are not supported.
-
16 GB RAM minimum is strongly recommended.
On the first run of each session, the plugin warms up — the model loads into RAM, which takes a moment. Because of this, long tracks (over 5 minutes) can push memory usage high; on machines with limited RAM you may notice brief slowdowns while the track is processed.
-
-
Lock — freezes all marker edits: no moving, renumbering, or renaming.
-
Remove All Markers — clears every marker from the track.
-
Remove — deletes the selected marker.
Markers List Table
-
The Marker column shows the marker's name. Double-click to edit it inline.
-
The Fade column shows the marker's fade time — also editable inline.
-
The Start column lets you change the marker's start time, again with an inline editor.
Footer
A status area showing various indicators at a glance.
-
On the left, you'll see live status messages during AI Marker generation — handy for following along as the plugin works.
-
On the right sits the info cluster: TCPLAYER version, FPS, and indicators for NDI, LTC, MTC, and Art-Net timecode.
These indicators are your at-a-glance diagnostics. Enable an output — say, MIDI timecode — and its indicator (MTC) turns green. Once a track is playing, the indicator animates. Green plus animation means TCPLAYER is definitely sending timecode or an NDI stream — which makes the footer the first place to look when a console or on-PC isn't receiving. If the light's green and moving on your end, the problem is downstream, not here.
Settings
Everything you can tweak in TCPLAYER lives here — tune it to fit the way you work.
Global Settings
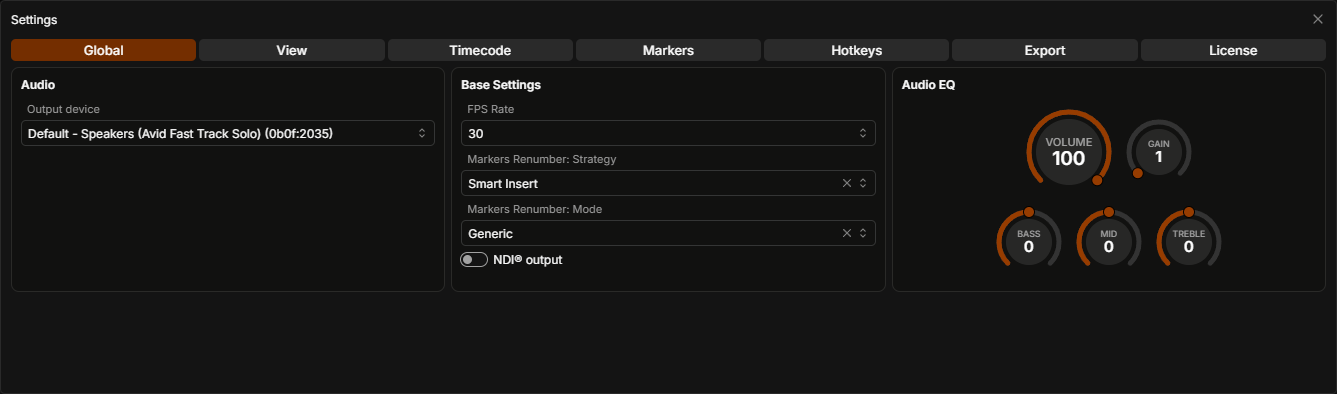
Settings that apply across all of TCPLAYER.
Audio
Pick the audio device for playback. Stick with your system default, or point TCPLAYER at a specific output.
Base Settings
-
FPS Rate — the frame rate TCPLAYER runs at. This one's global: it drives generated timecode, marker export, and LTC file generation. Any operation that needs a frame rate to do its math pulls the value from here.
-
Markers Renumber: Strategy — three options:
-
Smart Insert — when you add a marker between two existing ones (or drag a marker into place), it gets a number that leaves its neighbors untouched.
-
Renumber All — inserting a marker between two others renumbers the entire track, keeping everything in clean sequential order.
-
New Only — same logic as Smart Insert, but it only applies to newly created markers.
-
-
Markers Renumber Mode — two options:
-
Generic — new markers use an
n.n.nformat when neighbors already have fractional numbers. For example,2.3.5. -
MA — new markers use an
n.nformat when neighbors are fractional. For example,2.35.
-
-
NDI® Output — starts the NDI® server. If your media file carries a video track, this is a clean way to send that video over the network to another device.
Audio EQ
Shape playback to your taste. And if a track was recorded too quietly to work with comfortably, bump up the Gain.
View
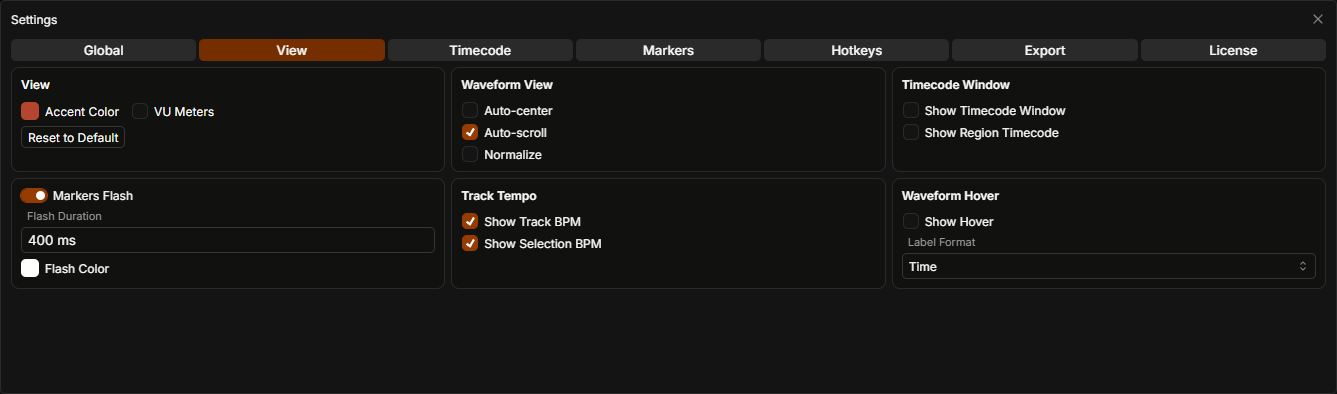
Everything that controls how TCPLAYER looks by default lives here.
View
- Change the accent color of the TCPLAYER interface.
Waveform View
-
Auto Center — keeps the playhead centered in the window during playback, scrolling the waveform to follow it. Only works when Auto Scroll is enabled.
-
Auto Scroll — the visible portion of the waveform follows the playhead, advancing page by page.
-
Normalize — scales the waveform to fill the window height. It's non-linear: zoom into a section and that section gets normalized to fit.
Timecode Window
-
Show Timecode Window — opens a separate window displaying the current timecode. You can resize it however you like, and move it to a second monitor if needed.
-
Show Region Timecode — shows not just the playhead timecode, but also the start and end of your selected region.
Markers Flash
A visual aid for syncing to sweep effects. Sometimes you want to nail a moment in the track that has no obvious shape in the waveform — Markers Flash lets you see, at a glance, exactly how tight your marker placement is.
-
Flash Duration — how long the flash lasts, in milliseconds.
-
Flash Color — the color of the flash.
Track Tempo
Detects the track's BPM in the background.
-
Show Track BPM — displays the BPM on the right side of the waveform.
-
Show Selection BPM — displays the BPM of a selected region. Useful when a track's tempo isn't constant.
Waveform Hover
With this on, hovering over the waveform shows the exact cursor position and its time value.
-
Show Hover — toggles the hover readout on.
-
Label Format — choose how the time is shown: timecode or seconds.
Timecode
Every kind of timecode TCPLAYER can generate is gathered here. One thing to note: while any timecode output is running, TCPLAYER won't let you switch the output device. Turn generation off first, then change the device.
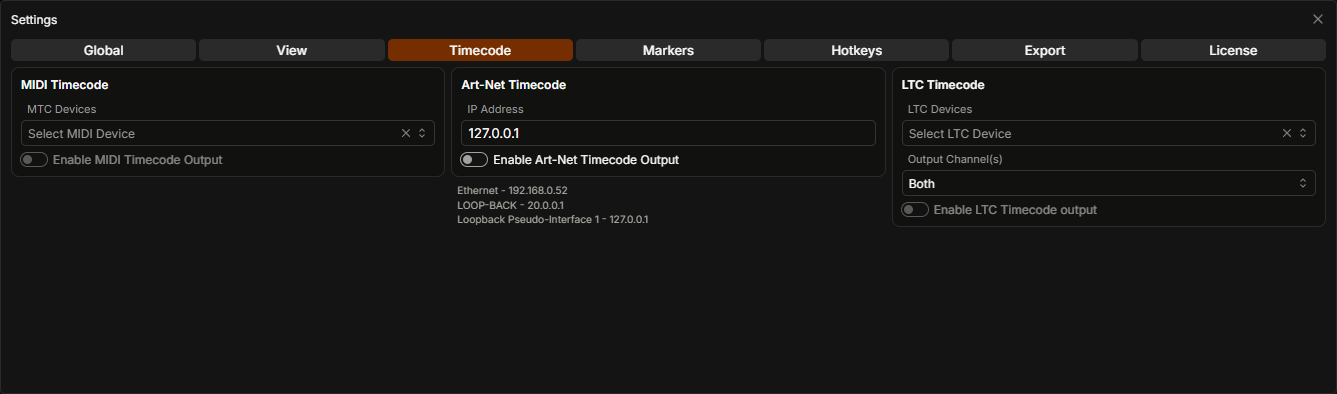
MIDI Timecode
Send MIDI timecode to any device your OS has registered.
-
MTC Devices — the list of available devices.
-
Enable MIDI Timecode Output — turn this on to start generating timecode.
Art-Net Timecode
Timecode that lives on your network.
-
IP Address — enter the address of the network adapter you want to send Art-Net timecode to. The panel below lists every network device TCPLAYER found on your machine. If you enter an address that doesn't exist, TCPLAYER won't warn you — so double-check it.
-
Enable Art-Net Timecode Output — start generating Art-Net timecode.
LTC Timecode
SMPTE-format timecode — the industry standard.
-
LTC Devices — pick the output device for LTC. You'll notice it's the same list of audio devices as in your audio output settings. You can point it at the same device as your audio, but that's pointless — use a separate one (an external sound card, for example).
-
Output Channel(s) — send LTC in "stereo" to both channels, or "mono" to just the left or right channel.
-
Enable LTC Timecode Output — start generating LTC timecode.
Markers
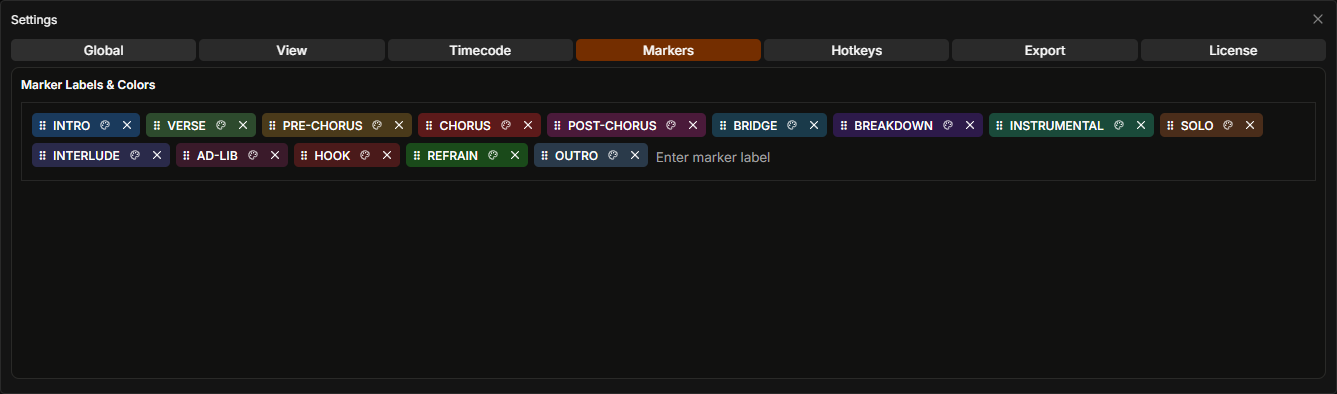
This is where you build your marker presets — add, remove, and edit the labels you reach for most, so you can drop them in fast while working. Each marker can be assigned its own color, making them easy to tell apart at a glance. To rename an existing preset, double-click it and type the new name into the field that appears.
Hotkeys
TCPLAYER is built around heavy keyboard use. As you've probably noticed, there aren't many on-screen controls — that's deliberate. The goal was to keep the GUI dense and hand as much space as possible to the waveform and markers.
Capture Hotkey
To reassign a hotkey, click Capture and then press the key you want. Here's the full list of TCPLAYER's default hotkeys.
| Action | Windows | Mac | OSC Path |
|---|---|---|---|
| Play / Pause | Space | Space | /tcplayer/transport/playPause |
| Second − | ← | ← | /tcplayer/transport/secondMinus |
| Second + | → | → | /tcplayer/transport/secondPlus |
| Frame − | ← | Cmd+← | /tcplayer/transport/frameMinus |
| Frame + | Ctrl+→ | Cmd+→ | /tcplayer/transport/framePlus |
| Increase Playback Rate | L | L | /tcplayer/transport/increasePlaybackSpeed |
| Decrease Playback Rate | J | J | /tcplayer/transport/decreasePlaybackSpeed |
| Stop Playback | K | K | /tcplayer/transport/stopPlayback |
| Clear Selection | X | X | /tcplayer/selection/clear |
| Add Marker | M | M | /tcplayer/marker/add |
| Delete Marker | Delete | Backspace | /tcplayer/marker/delete |
| Clear Markers Selection | C | C | /tcplayer/marker/clearSelection |
| Toggle Loop | Ctrl+L | Cmd+L | /tcplayer/transport/toggleLoop |
| Go To Start | Home | Home | /tcplayer/transport/goToStart |
| Go To End | End | End | /tcplayer/transport/goToEnd |
| Show BPM | B | B | /tcplayer/view/showBpm |
| Show Selection BPM | Ctrl+B | Cmd+B | /tcplayer/view/showSelectionBpm |
| Show Timecode Window | Ctrl+W | Cmd+W | /tcplayer/view/showTimecodeWindow |
| Save All | Ctrl+S | Cmd+S | /tcplayer/app/save |
| Toggle Compact Mode | Ctrl+` | Cmd+` | /tcplayer/app/compactMode |
| Export Markers | Ctrl+E | Cmd+E | /tcplayer/app/export/markers |
| Generate LTC to File | Ctrl+Shift+E | Cmd+Shift+E | /tcplayer/app/export/ltcFile |
| Toggle Always On Top | Ctrl+Alt+T | Cmd+Option+T | /tcplayer/app/alwaysOnTop |
| Undo | Ctrl+Z | Cmd+Z | /tcplayer/app/undo |
| Redo | Ctrl+Y | Cmd+Y | /tcplayer/app/redo |
OSC Remote
Want a dedicated control surface — a Stream Deck or an iPad — driving TCPLAYER? Just start OSC Remote. The OSC paths TCPLAYER listens on are shown in the table on the left, in the OSC Path column.
-
OSC Server IP Address — the IP address to run the OSC server on.
-
OSC Server Port — the port for the OSC server. Make sure the port matches on both TCPLAYER and the sending device.
-
Enable OSC Remote — starts OSC Remote.
Export
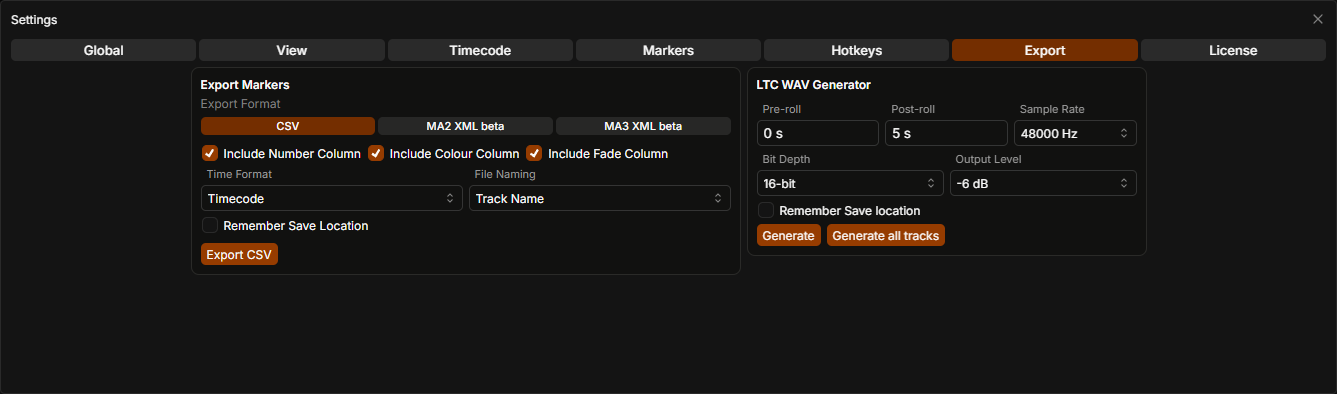
The markers you create while working on a track are exported according to these settings. You can export as plain CSV — readable by many consoles — or in dedicated formats for grandMA2 and grandMA3. The active export format is set by the tab you pick in the Export Markers panel. Either way, here are the settings shared across all three formats:
-
File Naming:
-
Track Name — exported filenames include the track name followed by a keyword like
timecodeormacro. -
Generic — filenames contain only the keywords, without the track name.
-
-
Remember Save Location — check this box to reveal fields where you can set the export save paths. With paths set, the Export hotkey (Ctrl+E on Windows, Cmd+E on Mac) saves straight to those locations without opening a dialog. Leave it unchecked and you'll get the save dialog on every export.
CSV Export
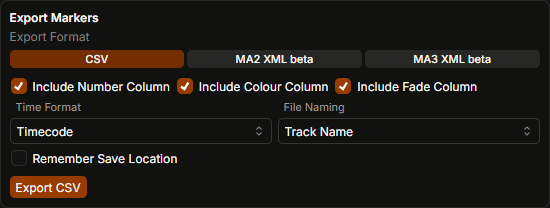
-
Include Number Column, Include Colour Column, Include Fade Column — check these to include the matching columns in the export.
-
Time Format
-
Timecode — export event start times as timecode.
-
Milliseconds — export event start times in milliseconds.
-
-
Export CSV — runs the export.
MA2/MA3 Export
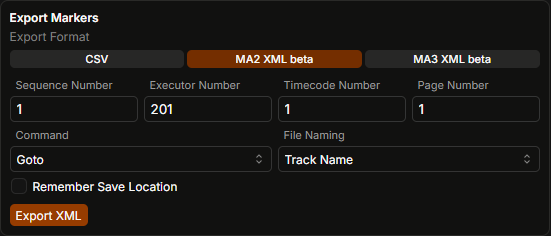
The MA2 and MA3 formats share the same settings. Configure the export as you need, and the output file comes out in whichever format you selected.
-
Sequence Number, Executor Number, Timecode Number, Page Number — these fields map directly to the corresponding entries in the exported files.
-
Command — choose between two options: Goto or Go.
-
Export XML — the main export button. Two files are produced: one macro file and one timecode file, both in XML format.
LTC WAV Generator
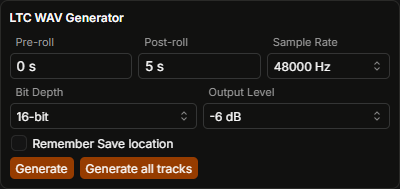
Export WAV files with SMPTE timecode encoded into the audio.
-
Pre-roll — seconds of timecode to add before the track starts.
-
Post-roll — seconds of timecode to add after the track ends.
-
Sample Rate — the audio sample rate.
-
Bit Depth — the audio bit depth (bits per sample).
-
Output Level — the level of the output signal.
-
Generate — creates the LTC WAV file for the current track.
-
Generate all tracks — creates LTC WAV files for every track in the playlist.
License
Activate your license key here.
Demo Mode
You can download the latest version of TCPLAYER and use every feature it has — but until you activate a license, a few demo limits apply:
- No more than 10 markers per track.
- Timecode output cuts out at random intervals, for random stretches of time.
- NDI® output is disabled.
- LTC WAV file generation is turned off.
Purchasing a License Key
You can grab a license key here: tcplayer.app/pricing
TCPLAYER isn't a subscription. There's no monthly or yearly fee - buy a key once, and TCPLAYER is yours for good.
Activating a License Key
The last tab in Settings is License. The first time you open it, you'll see this dialog:
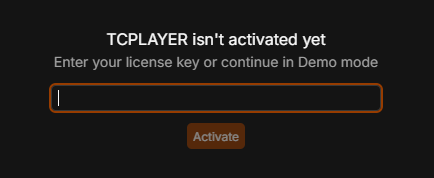
Just enter your license key in the field and hit Activate. Once it goes through, you'll see this:
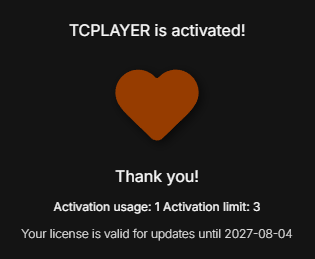
Keep in mind: each key allows two activations (two computers). If you need to free one up, reach out: tcplayer.app/contact - a self-service key management portal is in the works.